
I recently took a trip to one of California’s beautiful deserts, Joshua Tree National Park, to take some photographs and capture images of the mysterious and rarely photographed Jackalope, a rabbit with antlers.
After days of searching and only being able to get photos of a 7 foot hairy creature with large man feet I gave up. I realized I would never find anything mysterious out there and decided to do my first Star Trails photograph.
Even though I have never done this before I have taken time lapse videos of stars and I knew a few things I wanted to achieve with my first star trail picture.
- I wanted my photo to have star trails that centered around the North Star. This way my star trails would make partial circles.
- I wanted my horizon to be sharp and a silhouette, which would not happen easily if I leave the shutter open for a long time.
- I wanted to have the tail-end of the sun setting and my star trails in the same picture to produce richer colors.
Finding the North Star
How to Find Polaris: Find the big dipper and go straight up from the right side of the cup to the handle of the little dipper. The first star on the handle of the little dipper is the Polaris.
The first night I was out there I arrived when it was already dark and a full moon, taking star trail pictures when the moon is out will decrease the quality. I decided to scout out my shot, so I found out where the North Star (Polaris) was, then I found the landscape I wanted to use as my foreground. I wanted to make sure Polaris was in the center of my shot, this way the stars would circle Polaris and I would get my partial circles (#1 done).
The next day a little before sunset, I set up my shot on my tripod and took out my shutter release cord. A tripod and shutter release cord are essential to a night time photographer, like beer and donuts are to Homer Simpson. I took a few shots to make sure I liked my composition, ate some beef jerky and waited until sunset.
Once the sun went behind the horizon I took my first shot, a silhouette of the horizon with the glow of the sun coming from behind (#2 done). This was a quick shot Shutter Speed 1/60, F/4 and ISO 200. If you look closely at the mountain in the middle of the shot you can see a climber making his way down in silhouette (it only looks like a dot in this size photo). This insured that I would get the sharpness that I wanted and the setting sun. The details from the silhouetted horizon are amazing!
Without moving the tripod I waited for the sun to disappear and the stars to come out. I then took my shot for 1 hour and 45 minutes in bulb setting, F/4 and ISO 200. I only had one chance because the moon was going to rise 15 minutes after I turned off my shutter, always look at the rise and setting of the moon and sun when doing night photography.
Then when I got home I combined the two images and made minor adjustments in Photoshop (#3 done). I try not to do too much messing around with it in the computer to help keep the original colors from the photo.
This is the best way to get sharp silhouettes in your star trail pictures and to give beautiful warm colors from the ending of the day combined with the cold blues from the night sky. Take a look at my final picture below and if you have any star trail pictures of your own add your link to the comments below so I can take a look.
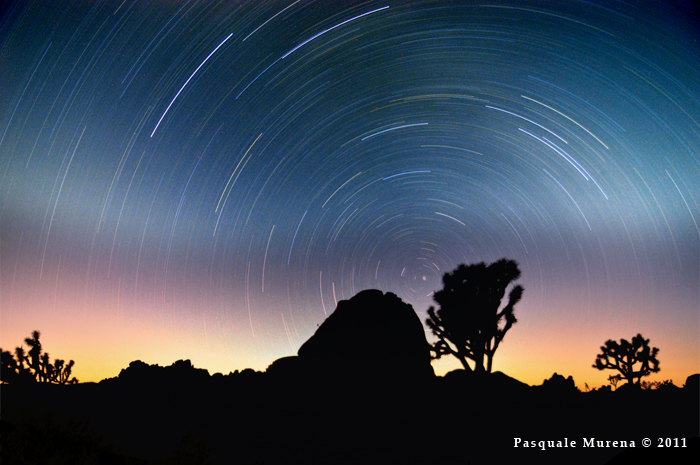
My photo of star trails at Joshua Tree National Park
5 Comments on “Star Trails Photography Tips at Joshua Tree National Park”
That is a helpful tip, makes it easier to get find the North Star, thanks man.
Love the colors and the silhouette.
That’s an amazing shot, kudos my friend.
That is friction’ awesome! You can even see the hiker!
Pingback: Starting the Year with Snow at Joshua Tree | Pasquale Murena's Film and Photography Blog